In branding terms, custom patches for your line offer more than decorative accents; they act as portable ambassadors that travel with each garment and quietly reinforce identity across products, teams, and fan communities, turning a simple patch into a recognizable symbol customers notice on shelves, in social feeds, and during unboxing, helping your line establish a cohesive story from season to season. Whether you begin with DIY patch making for rapid prototyping or you lean toward professional custom patches for scalable branding, the choice hinges on scale, durability, color fidelity, and the logistics of sourcing, including MOQs, lead times, licensing considerations, and the ability to reproduce precise colorways across multiple fabrics and product categories. For clothing patch customization and custom patches for apparel lines, you want predictable lead times, consistent finishes, and a look that survives washing, while maintaining a flexible roadmap for seasonal updates, designer collaborations, and licensing requirements that may dictate backing types, edge styles, or embroidery density. This guide helps you balance speed and polish, outlining when DIY makes sense for proofs and short runs and when professional patches deliver long-term cost efficiency, error-proof branding, and manufacturing peace of mind across multiple SKUs, fabrics, wash cycles, and overseas or domestic production scenarios. By understanding the strengths of each path, you can design a patch strategy that aligns with your line’s identity, production capabilities, distribution channels, and customer expectations, ensuring that every stitch communicates quality while staying budget-smart and adaptable to future reissues and market shifts, and with these insights, teams can justify investments, plan phased rollouts, coordinate licensing and merchandising, and align retail messaging to maximize impact across channels.
Viewed from an LSI-informed perspective, these items read as logos, emblems, badges, or branding patches that help customers recognize your line across garments and accessories. Variants such as embroidered, woven, or PVC patches convey different textures, durability, and price points, while backing options and edge finishes alter how they perform in wash cycles. Using related terms like ‘DIY patch making’, ‘professional custom patches’, ‘when to choose custom patches’, ‘clothing patch customization’, and ‘custom patches for apparel lines’ supports semantic clustering and helps users find all relevant content. By pairing precise details with broader descriptors, you improve SEO while preserving readability for readers exploring patch strategies.
DIY Patch Making for Rapid Prototyping and Testing
DIY patch making offers a fast, affordable way to prototype logos and test wearability on a sample garment. For clothing patch customization, you can sketch a logo, print or stitch it into a patch, and apply it using iron-on backs or heat-seal methods, which keeps upfront costs low during early testing.
While the speed and cost are attractive, DIY patches can vary in quality from batch to batch as you scale. Color matching, thread choice, and durability may be less precise than professional production, and small runs can raise per-unit costs when you factor in labor and setup.
Professional Custom Patches: Consistent Quality at Scale
Professional patches deliver consistent color reproduction, cleaner edges, and dependable backing options, making them ideal for apparel lines that require uniform branding across hundreds or thousands of units. For many brands, investing in professional custom patches ensures a predictable look across the entire apparel line.
By adopting professional custom patches, you typically gain lower per-patch costs at scale, better wash-fastness, and more reliable lead times for larger drops. They also simplify licensing compliance and brand protection for multi-year lines.
When to Choose Custom Patches for Your Line
Choosing between DIY and professional options depends on volume, branding needs, and durability expectations for your line. When to choose custom patches is a decision that hinges on your forecasted drops, target price points, and retail positioning.
If you’re aiming for licensing-heavy or premium apparel lines, professional patches for apparel lines provide precise color reproduction, repeatable finishes, and durable performance across washes.
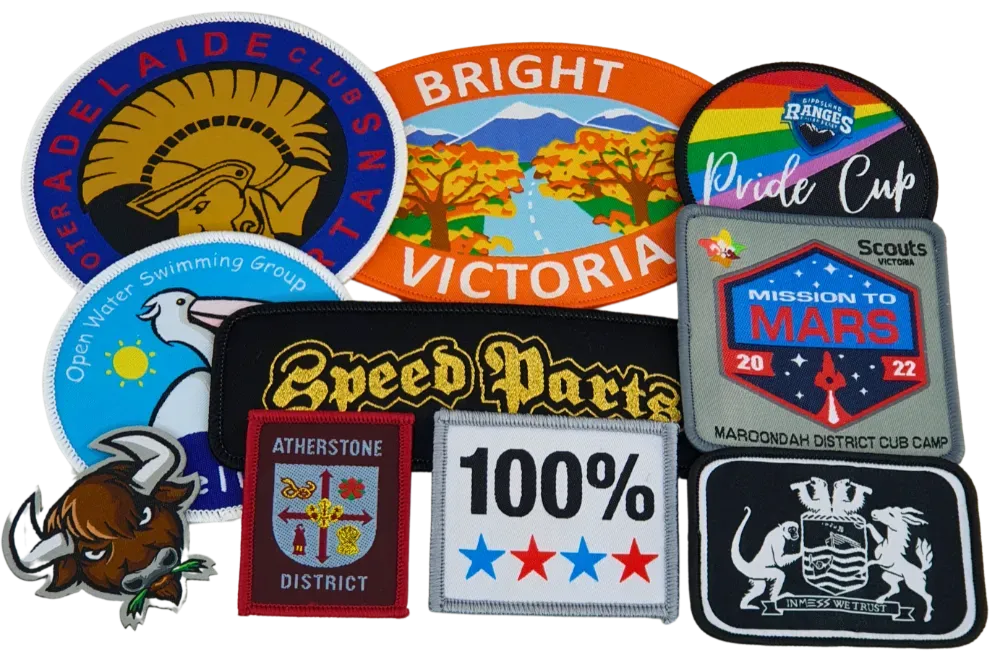
Patch Types and Materials for Clothing Patch Customization
Embroidered patches offer a classic look that’s versatile and cost-effective for many clothing patch customization projects. They work well for solid shapes and bold outlines, and can be stitched onto a wide range of fabrics.
Woven patches reproduce finer details and smaller text with a thinner profile, while PVC patches deliver bold, tactile branding that stands up to heavy use. Backings and edges—such as merrow borders or laser-cut finishes—shape the final aesthetic and durability.
Design to Production: Roadmap for Custom Patches
Design to production roadmap: finalize the concept, choose patch type and backing, and prepare vector artwork with PMS color references. Gather quotes from multiple manufacturers and request production-ready samples to verify size, color, texture, and attachment quality.
Approve proofs, confirm MOQs, and oversee production and quality control. Provide care and application instructions to maximize longevity and ensure your patches survive repeated washes, a consideration for custom patches for your line.
Blended Strategies: DIY and Professional Patches in One Line
Blended strategies let you start with DIY for rapid prototyping and limited drops, then shift to professional patches as demand grows. A hybrid approach stabilizes your supply chain while preserving design flexibility.
For clothing patch customization, a hybrid path lets you test ideas quickly and then scale with durable, consistent patches for the main line. Start small, learn from feedback, and gradually transition to professional patches for larger season launches.
Frequently Asked Questions
What is the difference between DIY patch making and professional custom patches for your line?
DIY patch making and professional custom patches each serve different needs in clothing patch customization. DIY patch making is fast and low-cost for prototypes and small tests, allowing you to iterate quickly. However, quality and durability can vary at scale. Professional custom patches provide consistent color, durable finishes, and scalable production, making them ideal for branding across hundreds or thousands of units.
When should you choose custom patches for your line: DIY patch making or professional patches?
For early-stage testing, prototypes, or limited drops, DIY patch making is practical and budget-friendly. For ongoing lines, larger drops, licensing, or items that will be washed frequently, professional patches offer predictable lead times, better consistency, and lower unit costs at scale.
How does clothing patch customization differ when using DIY patch making versus professional patches for your line?
DIY patch making enables rapid prototyping and on-demand testing of logos and sizes, but color accuracy and wear resistance may vary. Professional patches standardize color, edge finishing, backing, and durability, delivering a consistent, high-quality look across your entire line.
What factors influence the choice of backing, edge finish, and patch type for custom patches for apparel lines?
Choose patch type (embroidered, woven, or PVC) based on detail and durability. Backing (iron-on, heat-seal, or sew-on) affects washability and attachment. Edge finishes (merrow, laser-cut, or satin) influence appearance and wear resistance. Together, these determine comfort, branding fidelity, and care requirements for your apparel line.
What are typical costs and lead times for DIY patch making versus professional custom patches for your line?
DIY patch making usually has lower upfront costs and faster prototyping but higher per-unit costs and greater variability for larger runs. Professional patches require MOQs, tooling, and proofs but offer lower per-patch costs at scale and more reliable lead times for bulk production.
What steps are essential in the design-to-production process to realize custom patches for your line?
Key steps include finalizing the concept and branding, selecting patch type and backing, preparing vector artwork and color specs, requesting quotes and production-ready samples, approving proofs and MOQs, overseeing production and quality control, and providing application and care instructions for customers.
| Topic | Key Points | Notes / When to Consider |
|---|---|---|
| DIY Patch Making: Pros and Cons | Pros: Low upfront cost; Fast iteration; Full design control; Ideal for short, limited runs. Cons: Quality/consistency can vary; Color matching/thread selection less precise; Durability may be lower without industrial equipment; Small batches can raise per-unit costs. | Good for prototyping and early testing; not ideal for high-volume, quality-critical builds. |
| When to Use DIY Patch Making for Your Line | Use for proof-of-concept, logo testing, rapid prototypes for photo shoots and social content, and limited-edition drops where exploration is the goal. | Best for early-stage lines and fast feedback loops. |
| Professional Custom Patches: What They Bring | Pros: Consistent quality; Professional color matching; Wider options for threads/materials/backing; Durable finishes (merrow edges, heat-cut); Lower per-patch costs at scale; Reliable lead times; Easier branding control. | Ideal for large volumes and licensed or long-term lines. |
| When to Choose Custom Patches for Your Line | Consider volume/turnaround, brand consistency, durability needs, design complexity, and budget realism. | Guides decision based on scale and brand requirements. |
| Cost, Lead Time, and Quality: What to Expect | DIY: Low upfront costs but higher unit costs as you scale. Professional: Upfront MOQs/tooling/proofs, but lower unit costs, consistent color control, and reliable durability at scale. | Trade-off between speed/flexibility and scale/consistency. |
| Patch Types and Materials: Choosing the Right Look for Your Line | Embroidered, woven, and PVC patches. Backings/edges matter: merrow edges, laser-cut or satin edges. Backings include iron-on, heat-seal, or sew-on. | Material choice impacts washability and durability. |
| Design to Production: How to Realize Custom Patches for Your Line | 1) Finalize concept; 2) Choose patch type/backing; 3) Prepare artwork/color specs; 4) Request quotes and samples; 5) Approve proofs and MOQs; 6) Production and quality control; 7) Application and care instructions. | End-to-end workflow from concept to finished patches. |
| DIY and Professional Paths as a Complementary Strategy | Use a blended approach: start with DIY for rapid prototyping and market testing; scale to professional patches for larger runs, stronger branding, and higher durability. | Supports clothing patch customization across a range of needs—from one-offs to full-season collections. |
| Real-World Scenarios: When Each Path Shines | Startups/indie labels: prototypes/limited drops; Licensing-heavy lines: professional for color accuracy; Teams/clubs with frequent updates: durable, repeatable patches; Premium fashion lines: refined professional finishes. | Demonstrates practical usage cases. |
| Key Takeaways: How to Decide for Your Line | DIY for fast prototyping and small runs; professional for consistency, durability, and scalable production; plan for long-term costs; choose patch type/backing/edge finishing based on use and brand. | Provides a decision framework for patch strategy. |
Summary
Custom patches for your line offer brands a flexible path to strong branding and durable garments. By blending DIY prototyping with professional production, you can move quickly from concept to market while maintaining color accuracy, durability, and scalable lead times. Start with DIY for fast feedback and then shift to professional patches for larger drops and licensed designs. Consider patch type, backing, and edge finishing to align with garment use and brand image, and plan MOQs and timelines accordingly. The smarter approach is to blend both paths to fit the lifecycle of your line, ensuring patches that strengthen your brand at every touchpoint.