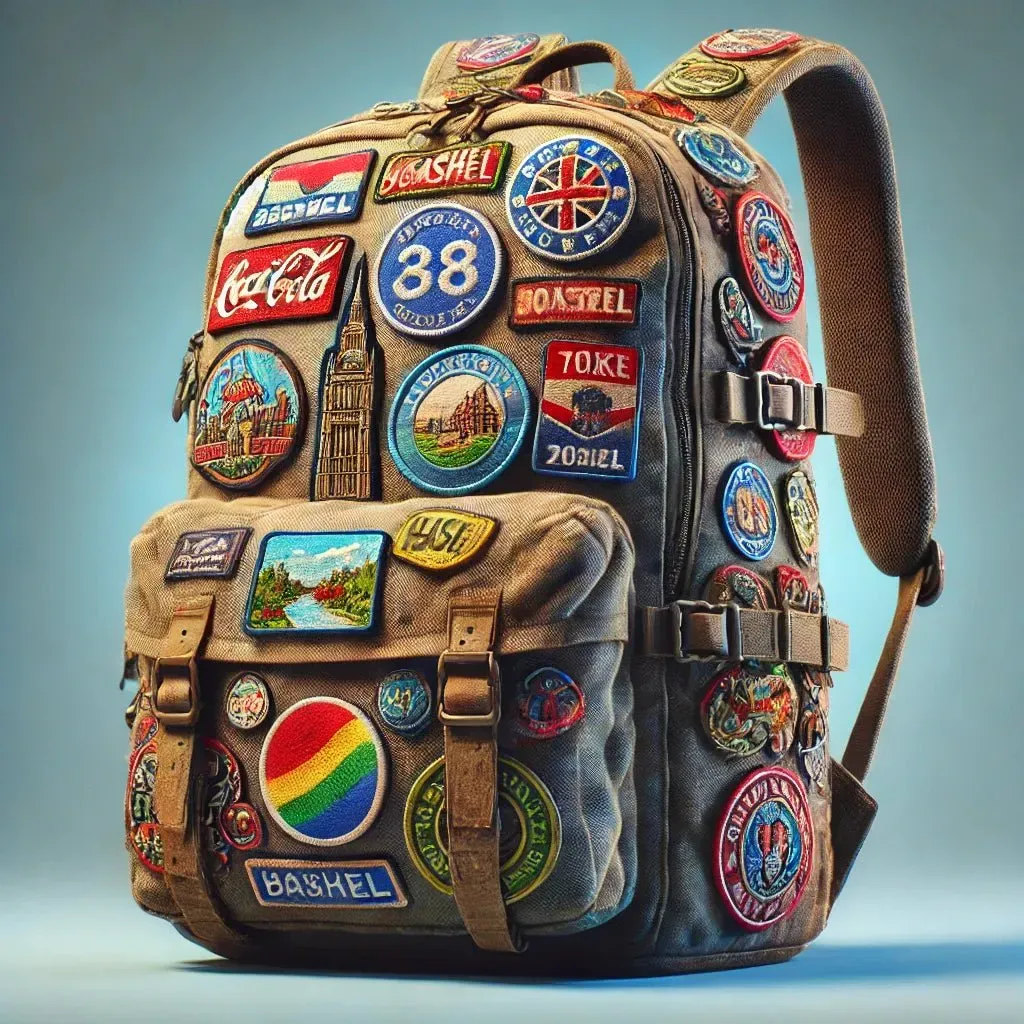
Patches for backpacks and bags are more than decorative accents; they offer practical upgrades that can extend the life of everyday carry gear while letting you express personal style, from weathered canvas to frayed seams that need reinforcement. Whether you’re a student, traveler, hiker, or commuter, backpack patches offer a simple, affordable way to refresh worn fabric, cover stains or tears, and refresh your bag’s personality, and they’re easy to swap as trends shift. When choosing, look for options that are easy to apply patches, with durable backing and colorfast threads that resist washing and abrasion, and this combination helps preserve the patch’s color and adhesion through regular laundering and rough use. Durable patches for bags with reinforced edges and heat-resistant backings ensure the look lasts, while embroidered patches for backpacks add timeless detail, and these elements blend durability with a classic aesthetic for everyday carry gear. DIY bag patches let you customize colors and motifs, making each bag feel truly yours, and it’s a quick creative outlet that scales from subtle updates to bold statements.
Beyond the exact term patches for bags, the idea translates into bag adornments, fabric embellishments, and repair accents that extend durability and personalize daily gear. LSI-friendly wording groups these items with gear customization, decorative appliques, and modular insignias that communicate personality and use in everyday contexts. Related formats include embroidered emblems, woven patches, PVC emblems, or simple sew-on badges that can be applied to canvases, denims, or travel packs. Regardless of whether you choose iron-on, sew-on, or adhesive options, the underlying benefits are similar: protection from wear, an easy refresh, and a personalized look. Using diverse terms helps content reach readers researching related topics like bag accessories, fabric patches, and DIY embellishments. By using related terms and diverse descriptors, this approach helps readers discover practical, durable upgrades for everyday bags through a broader web of related topics.
Patches for backpacks and bags: Practical upgrades that extend gear life
Patches for backpacks and bags are more than decorative accents; they can reinforce wear points, cover small tears, and extend the life of your daily carry gear. By choosing durable patches for bags, you can refresh a tired bag while expressing personal style.
This guide explores options like embroidered patches for backpacks, woven patches, and PVC patches, and explains how to apply them for reliable, long-lasting results.
Materials and durability: choosing patches that stand up to daily use
Patch material and backing affect durability and how well patches hold up to washing and abrasion. Look for embroidered patches for backpacks with sturdy backing and colorfast threads, or choose woven patches for denser detail that lies flat on rugged fabrics.
For outdoor or travel bags, PVC patches offer weather resistance and a bold look. Ensure compatibility with fabrics such as canvas or denim, and check how edges are finished to prevent peeling, a key factor in durable patches for bags.
Applying patches: easy to apply patches and reliable methods
Patches come with several application methods—iron-on, sew-on, or glue-on—and each has pros and cons. For everyday reliability, considering easy to apply patches often means sew-on or iron-on with reinforced edges.
Follow a simple workflow: clean and dry the surface, test fit on your bag, then choose your method. For long-lasting results, sew-on patches offer the strongest hold, especially on bags that see heavy use.
Embroidered patches for backpacks: style with durability
Embroidered patches for backpacks provide color, texture, and a classic look that resists fraying when attached properly. They pair well with woven or twill backings and work nicely on canvas, denim, or nylon bags.
When designing a layout, consider shapes, size, and color to complement hardware and bag panels. A balanced arrangement of embroidered patches for backpacks can create a timeless, tasteful statement.
DIY bag patches: personalization and creative control
DIY bag patches put customization in your hands, allowing you to craft symbols, slogans, or color schemes that reflect your interests. You can source blank patches and apply your own embroidery, pins, or fabric paint to create one-of-a-kind pieces.
If you’re new to DIY, start small with a single patch on an inexpensive bag to practice stitching or glue techniques before applying patches to your go-to backpack or tote.
Sourcing and care: where to buy and how to maintain patches
Look for patches from reputable sellers that provide clear product details, backing options, and care instructions. Reading customer reviews helps gauge durability, colorfastness, and stitching quality, especially for embroidered patches for backpacks.
Care tips include washing cold, air drying, avoiding high heat, and re-applying patches if edges begin to lift. With proper maintenance, your patches can stay vibrant and secure for miles to come.
Frequently Asked Questions
What are Patches for backpacks and bags and why should I consider using them?
Patches for backpacks and bags are fabric patches that serve as decorative accents and practical repairs. They extend the life of bags, cover wear, and let you express personal style. Options include embroidered patches for backpacks, woven patches, and PVC patches. They can be applied with easy-to-use methods—iron-on, sew-on, or glue-on—but for longevity, choose durable patches for bags and sew-on patches when possible.
Which patch type should I choose for backpacks—embroidered, woven, or PVC?
It depends on fabric and style. Embroidered patches for backpacks offer timeless color and stitching; woven patches deliver dense detail and lay flat on canvas or denim; PVC patches give a bold, weather-resistant finish. For rugged daily use, consider durable patches for bags and choose a method (sew-on for durability, iron-on if you need easy to apply patches).
How do I apply patches to a backpack or bag for the best results?
Begin with a clean surface and test-fit the patch. Choose your method: iron-on, sew-on, or glue-on. For long-lasting results, sew-on patches are most reliable. Iron-on patches require heat and time to set; glue-on is fastest but may peel with washing. Finish by securing edges with stitching if needed.
Are embroidered patches for backpacks durable enough for frequent use and washing?
Yes, when properly attached. Embroidered patches for backpacks are typically durable, especially with reinforced backing and colorfast threads. To maximize life, follow care instructions, and opt for patches marketed as durable patches for bags. If washing, prefer sew-on patches and avoid high heat.
Where should I place patches on a backpack or bag for the best visual balance and function?
Place patches on large, flat surfaces away from zippers, pockets, and seams. Front panels, main body, or the top lid work well. For a clean look, use a symmetrical layout; for a playful vibe, scatter smaller patches. This applies to patches for backpacks and bags regardless of patch type.
Where can I buy patches for backpacks and bags, and how do I choose reputable sellers?
Shop from reputable sellers that provide clear product details, backing options, and care instructions. Read customer reviews for durability and colorfastness. If you’re into DIY bag patches, look for blank patches with quality embroidery and easy-to-follow instructions. For outdoor bags, consider PVC patches for weather resistance.
| Aspect | Key Points |
|---|---|
| What patches are and why they matter | Patches are practical upgrades that extend the life of everyday carry gear, refresh worn fabric, cover stains or tears, and let you express personal style. |
| Who benefits | Students, travelers, hikers, and commuters can all refresh and customize bags they use daily. |
| Common patch types | Embroidered (classic, colorwork; supports sewing or ironing), Woven (dense, detailed, lays flat), PVC (raised, durable, weather-resistant); backing varies by type. |
| Application methods | Iron-on (fast but potentially weaker over time), Sew-on (strongest hold), Glue-on (quick but may peel with washing). |
| Design considerations | Think about size, shape, and color; placement on large flat areas works best; symmetrical layouts feel balanced, while scattered patches convey a DIY vibe. |
| Durability & compatibility | Choose patches labeled durable for bags with reinforced edges, heat-resistant backing, and colorfast threads; ensure patch backing suits your bag material. |
| Placement guidance | Avoid zippers, pockets, or seams; place on front panel/top lid/main body; plan a symmetrical layout or a playful scatter depending on style. |
| Quick-start application steps | 1) Clean surface 2) Test fit 3) Choose method 4) If iron-on, heat and press 15–30s 5) If sew-on, stitch around edges 6) If glue-on, apply and cure 7) Check edges and finish with extra stitching if needed. |
| Maintenance & care | Gently wash in cold water, air dry; avoid high dryer heat; if peeling occurs, re-apply or stitch edges for durability. |
| Styling ideas | Color-blocking, mixed textures (embroidered + PVC), thematic motifs, seasonal updates, and layered patches for a dynamic look. |
| DIY & sourcing tips | DIY patches let you customize size/color; buy from reputable sellers with clear backing and care instructions; check reviews and patch backing to ensure proper adhesion. |