Color Theory for Embroidered Design is the compass that guides thread choice, fabric selection, and stitch planning. When you start with a solid understanding of color relationships, your embroidery projects move from nice to cohesive and expressive, turning ideas into intentional, visually compelling work. This guide shows how embroidery color theory translates into practical decisions about thread color selection and fabric color coordination while helping you build color palettes for embroidery that elevate each stitch. By embracing these ideas, you’ll develop a systematic approach to color that reduces guesswork and increases impact across every element of your piece. Think of contrast and value in embroidery as the knobs you tune to guide the eye, while neutrals anchor the palette and the fabric background sets the stage.
From another angle, the language of color in stitching can be described through hue relationships, tonal balance, and chroma pairing that shape how a design reads on fabric. Instead of a single rulebook, you can rely on palette planning, value shifts, and contrast cues to guide thread color choices and ensure legibility at a distance. Using terms like shade harmony, saturation dynamics, and temperature alignment, you capture the same ideas behind the concept of color theory for embroidery while embracing diverse vocabularies. By embracing this LSI-informed perspective, you can experiment with temperature, texture, and finish to create cohesive embroidery that feels intentional up close and reads clearly from afar. This second look keeps your storytelling vibrant while helping you plan threads and fabrics with confidence.
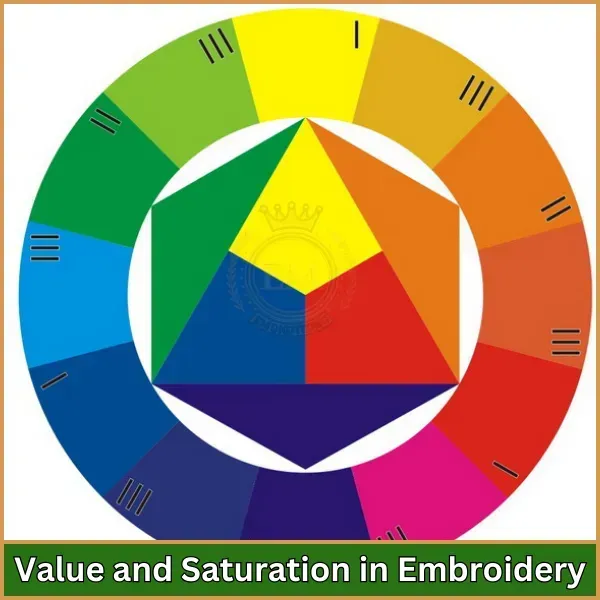
Color Theory for Embroidered Design: Reading the Color Wheel for Stitch Planning
Color Theory for Embroidered Design starts with understanding how the color wheel translates to thread choices and fabric tones. In embroidery color theory, complementary, analogous, and triadic relationships guide which threads will read clearly and which combinations will feel intentional rather than accidental. By visualizing these relationships, you can pre-plan which threads to pair with your base fabric to achieve harmony or intentional contrast across your stitched motifs.
Begin by anchoring your palette to the fabric you’ve chosen and then selecting anchor colors that support the mood you want to convey. Testing nearby hues on fabric swatches helps you see how temperature, saturation, and value interact at stitching scale. This deliberate approach to thread color selection, grounded in color-wheel logic, makes your embroidery feel cohesive and purposeful from first stitch to final detail.
Choosing Threads That Sing: Building a Harmonious Palette for Embroidery
The engine of a vibrant embroidery piece is thread color selection. Start with your fabric as the anchor, then choose one or two core thread colors and explore nearby hues that strengthen or soften the overall effect. The finish of the thread—matte cotton floss, shiny rayon, or luxurious silk—also shifts perception, so consider how texture influences color balance as you build your palette for embroidery.
A practical workflow for palette development includes testing swatches and committing to a core plan before you stitch. Include neutrals to ground brighter tones and vary saturation to create depth. By testing at swatch scale and adjusting based on how colors read on the fabric, you can craft a cohesive palette that supports your design intent.
Fabric Color Coordination and Perception: Choosing the Right Backdrop
Fabric color coordination shapes how thread colors will ultimately appear. The fabric acts as a global backdrop that can soften bold tones or amplify contrasts, changing the effect of your chosen palette. When planning, select a fabric color that complements your dominant thread colors and use the fabric’s value to guide how bold or muted your stitches should be.
Texture and lighting further influence perception. A busy fabric texture can merge colors, while a smooth surface may reveal subtle shifts in hue. Always test your color choices on a small swatch in your typical lighting to confirm that the fabric’s color and texture support the intended contrast and readability of your embroidery.
Palette Building Strategies: Monochromatic, Analogous, and Complementary Schemes
Palette building for embroidery often relies on three core schemes: monochromatic, analogous, and complementary. Monochromatic schemes use variations of a single color to create depth through value and saturation, ideal for delicate, refined pieces where the fabric dominates. Analogous palettes, with neighboring hues on the color wheel, feel cohesive and natural—great for floral motifs and nature-inspired designs.
Complementary palettes pair colors opposite each other, delivering high-contrast energy that can emphasize focal points or accents. Use these sparingly to avoid overwhelming the design. Beyond these basics, triadic and tetradic schemes introduce additional color relationships that still balance with careful attention to thread finish, fabric color coordination, and stitch density to maintain legibility from a distance and up close.
Value, Contrast, and Texture: Making Color Read on Fabric
Value—the lightness or darkness of a color—drives contrast and readability in embroidery. When you choose colors, ensure there is sufficient value separation between key hues so that lines and shapes remain distinct on the fabric. High-contrast pairings can guide the viewer’s eye, while lower-contrast blends create a subtler, more tonal effect.
Texture interacts with color in meaningful ways. A matte thread will read differently than a shiny one, changing perceived color even if the hue is the same. Deciding between soft gradients or crisp edges depends on your goal for the stitched piece, and it should align with your broader embroidery color theory and palette strategy.
A Practical Workflow: From Fabric Selection to Final Embroidery Palette
A repeatable workflow helps you move from concept to finished piece with confidence in your color choices. Start by selecting the fabric and assessing its color and texture, then define the mood of the design. Build a core color plan anchored to one or two hues and map them on the color wheel to locate nearby or opposite hues for contrast.
Next, add 2–4 supporting shades and a neutral for balance, then test with swatches using different stitches to observe how colors read at full size. If colors appear muddy or too loud, adjust lightness or swap for a more suitable neutral anchor. Commit to the final palette once swatches confirm the intended color storytelling, ensuring consistency with your broader goals in embroidery color theory and thread color selection.
Frequently Asked Questions
What is Color Theory for Embroidered Design and how does it guide thread color selection and fabric color coordination?
Color Theory for Embroidered Design provides a practical framework for choosing thread colors and coordinating fabrics. Start with the fabric as the anchor, assess its warmth/coolness and value, and apply color wheel relationships—complementary, analogous, and triadic—to pick threads. Test swatches on the fabric to see how colors read at stitching scale, and use neutrals to balance bright hues. This approach reduces guesswork and helps create cohesive, expressive embroidery.
How does embroidery color theory guide color palettes for embroidery to achieve harmony and contrast?
By defining color palettes for embroidery, color theory helps you choose cohesive groupings like monochromatic, analogous, and complementary schemes. Consider the fabric color coordination when selecting threads, and adjust brightness and saturation to suit the mood. Build your palette around 2–4 anchor colors plus neutrals, then test on fabric swatches to confirm readability and harmony.
In embroidery color theory, why are contrast and value in embroidery critical when planning on light vs dark fabrics, and how should they influence thread color selection?
Value controls how colors stand apart on fabric, affecting readability. On light fabrics, opt for higher-contrast thread colors; on dark fabrics, mid-to-high contrast colors work better to maintain definition. Remember temperature and texture also shift perceived color, so test swatches to confirm the desired contrast.
What is a practical workflow for choosing threads and fabrics using Color Theory for Embroidered Design?
Follow a practical workflow: 1) Select the fabric first as the anchor; 2) Define the design mood; 3) Build a core color plan using the color wheel; 4) Add 2–4 supporting tones plus a neutral; 5) Test with swatches and different stitches; 6) Adjust values or swap neutrals; 7) Apply the final palette with confidence.
How do temperature and texture influence color palettes for embroidery within Color Theory for Embroidered Design?
Color temperature (warm vs cool) sets mood, and thread finish (matte vs shiny) changes color perception. Choose a palette that aligns with fabric color coordination and test how texture affects value and readability under your lighting. Adjust hue saturation and avoid over-saturation to keep balance.
What common mistakes in embroidery color theory should be avoided and how can you fix them in terms of fabric color coordination and contrast and value in embroidery?
Common mistakes include over-saturation on a light fabric, poor contrast, mismatched temperature, ignoring fabric texture, and lighting shifts. Fixes: pare back to 2–4 colors with a neutral anchor, increase value separation, align temperature across fabric and thread, test on fabric swatches, and view under multiple lighting conditions.
| Topic | Key Points | How to Apply |
|---|---|---|
| Overview: Color Theory for Embroidered Design | – Acts as a compass for thread choice, fabric selection, and stitch planning. – Understanding color relationships makes embroidery cohesive and expressive. |
– Build a solid foundation in color relationships before selecting threads or fabrics. – Plan palettes early in a project to guide decisions and reduce guesswork. |
| Color wheel concepts (complementary, analogous, triadic) | – Color relationships help predict how colors read on fabric. – Complementary (opposites), analogous (neighbors), triadic (three evenly spaced) inform harmony and contrast. |
– Visualize and map thread colors using the wheel to create clear reading and intentional contrast. – Choose schemes based on desired mood and emphasis in the design. |
| Color temperature, value, and saturation | – Temperature: warm vs cool affects mood; value: lightness/darkness impacts contrast; saturation: intensity of color. | – Align fabric warmth/coolness with thread choices; test for readability on the intended fabric color and under your lighting conditions. |
| Choosing threads that sing on fabric | – Start with the fabric as an anchor (warm/cool, value). – Define emotional tone (bold vs soft). – Build from core colors and test harmonies with swatches. – Consider thread family and finish; neutrals help balance. |
– Choose anchor colors first, then test nearby hues on your fabric with swatches to see how they read at stitching scale. – Select finishes (matte/satin) to achieve the desired color balance. |
| Fabric color coordination and its impact | – Fabric color acts as a global backdrop that alters perceived thread colors. – Strategy: complement dominant thread colors, use fabric value to guide contrast, consider texture, and test on fabric swatches. |
– Choose fabrics that enhance your dominant hues; adjust thread contrast based on fabric value; test on swatches to account for texture and lighting. |
| Palette-building strategies | – Monochromatic: variations of a single color; Analogous: neighboring colors; Complementary: opposite colors; Triadic/Tetradic as expansion. | – Start with one color family, then expand using nearby or opposite hues; add neutrals for balance; test value and texture variations. |
| Value, contrast, and texture in embroidery | – Value governs contrast and legibility; texture changes how color reads on different thread finishes. | – Plan for sufficient value separation; choose thread finishes (matte vs shiny) to achieve intended texture and color balance. |
| Practical workflow for choosing threads and fabrics | – 1) Select fabric first; 2) Define design mood; 3) Build core color plan; 4) Add 2–4 supporting tones; 5) Test with swatches; 6) Adjust as needed; 7) Commit to final palette. | – Follow the seven steps on swatch tests under your typical lighting to lock in a durable palette. |
| Common mistakes and how to fix them | – Over-saturation: limit to 2–4 colors with a neutral anchor. – Poor contrast: increase value separation or add a dark outline. – Temperature mismatch: align fabric and thread temperature. – Texture ignored: test on actual fabric; adjust colors. – Lighting differences: view swatches in multiple lighting conditions. |
– Simplify palettes, ensure sufficient contrast, and test under typical working light to avoid misreads. |
| Real-world examples and tips | – Seaside motif on soft blue-gray linen: cool blues, teals, and warm coral accents. – Botanical on off-white: pale greens with olive accents (monochromatic feel). – Geometric on charcoal: high-contrast blue/orange for emphasis. |
– Analyze how real projects apply theory: test palettes on fabric types and adjust with thread finishes to reinforce mood and rhythm. |
| Testing tools and resources | – Color wheels/harmony charts; swatch cards; stitch libraries; digital tools to simulate thread colors on fabrics. | – Use these tools to visualize relationships before stitching; maintain a repeatable color workflow. |
Summary
The table above provides a concise, actionable summary of the key ideas from the base content on Color Theory for Embroidered Design. It highlights how color relationships, temperature, value, and texture influence thread and fabric choices, and outlines practical steps for building palettes and avoiding common mistakes. Reading these points alongside the full guide will help you apply color theory more effectively to embroidery projects.