Embroidered design stitches bring texture, depth, and personality to fabric projects. Whether you’re starting with backstitch embroidery or exploring satin stitch embroidery for smooth fills, understanding core stitches helps you outline shapes, fills, and decorative textures with confidence. This guide covers the essentials and references common types of embroidery stitches to help beginners follow a clear hand embroidery stitches guide. This primer offers practical techniques and embroidery stitch techniques, along with tips and project ideas, to help you craft outlines, fills, and textures with confidence. From choosing fabrics to selecting threads, the article equips you to expand your skills across a wide range of fabrics and threads.
Think of this craft as needlework and fabric embellishment, where stitched motifs add character through thread and texture rather than dye alone. Instead of focusing on the exact term, you might explore thread-based outlines and satin fills, building interest with a palette of colors and stitch effects. This approach blends traditional hand stitching with contemporary textile art, using techniques such as running, stem, chain, and French knots to create dimensional patterns. Whether you’re a beginner learning basics or a seasoned maker expanding your repertoire, the core idea remains: precision, consistency, and creative layering yield expressive results.
Embroidered Design Stitches: Core Techniques for Outlines, Fills, and Texture
Embroidered design stitches form the backbone of many fabric projects, offering texture, depth, and personality. By mastering stitches like backstitch embroidery and satin stitch embroidery, you can create bold outlines, smooth color fills, and decorative textures that stand out on any textile. This section highlights the essential family of stitches and sets the stage for a fuller hand embroidery stitches guide that covers both technique and application.
Understanding embroidered design stitches is a doorway to more expressive work. The approach combines precision with creativity: plan a path for outlines, layer fills for depth, and add texture with accent stitches. By thinking in terms of embroidery stitch techniques—tension, density, overlap, and sequencing—you’ll be able to translate ideas into durable, aesthetically pleasing motifs on a wide range of fabrics and threads.
Backstitch Embroidery: The Backbone of Clean, Continuous Lines
Backstitch is the go-to method for producing clean, continuous lines that define shapes, lettering, and edges. Its reliability makes it a cornerstone in any hand embroidery stitches guide, offering a neat front appearance while keeping the back nearly flat and unobtrusive. This stitch lends itself to precise outlines that support more complex fills and textures.
Tips for success include anchoring the thread securely, maintaining a steady pace, and keeping stitch lengths uniform—typically 2–3 millimeters for most projects. With practice, you can vary length to imitate handwriting or add subtle motion to your designs, expanding beyond basic outlines into expressive lines that complement satin stitch fills and other embroidery stitch techniques.
Satin Stitch Embroidery for Smooth, Glossy Fills
Satin stitch embroidery is prized for its glossy, opaque fills that resemble a smooth satin surface. It’s ideal for bold shapes and solid color areas where even density and seamless coverage matter. Using satin stitch embroidery, you can achieve a luxurious, museum-quality finish that elevates a simple motif into a polished work of hand stitching.
To maximize results, work in parallel stitches and keep gaps to a minimum. Start with a light outline guide, then layer long stitches perpendicular to the fill direction, followed by shorter stitches to fill any remaining gaps. The choice of threads—perle cotton for a crisp sheen or high-quality embroidery floss for color depth—can influence how smoothly fibers glide through fabric and how durable the final surface feels.
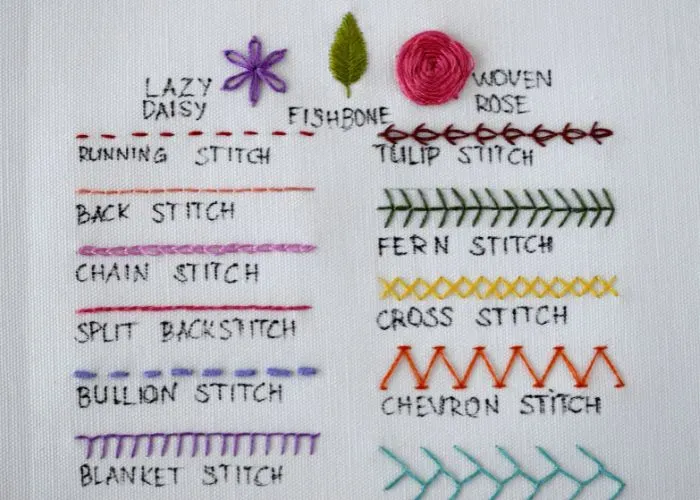
Exploring Types of Embroidery Stitches: From Outlines to Decorative Textures
Exploring the types of embroidery stitches expands your toolkit beyond the basics. Running stitch, stem stitch, chain stitch, and French knot each bring a distinct texture and rhythm to a design, enabling you to craft gentle borders, subtle shading, or bead-like centers. This overview aligns with the broader idea of a hand embroidery stitches guide, helping you map stitches to design goals.
Mixing stitches thoughtfully lets you layer textures and achieve nuanced shading. For example, use backstitch for crisp outlines, chain stitch for decorative edges, and French knots for small, raised accents. By practicing a variety of stitches, you build versatility and confidence you can apply to embroidery stitch techniques in projects ranging from florals to geometric motifs.
A Handy Hand Embroidery Stitches Guide: Tools, Fabrics, and Techniques
A practical hand embroidery stitches guide starts with choosing the right tools, fabrics, and threads. Hoops or frames keep fabric taut to reduce puckering, while even-weave fabrics provide a stable grid for consistent stitches. For materials, cotton floss, perle cotton, and metallic threads each offer distinct textures and sheen that influence how stitches sit on the fabric.
Fabric and thread choice matters as much as technique. Practice on swatches to dial in tension and stitch length before tackling a full project. This section also covers planning, threading, and needle selection, helping you build a personal workflow that supports steady progress and reliable results across different fabrics and project scales.
Mastering Embroidery Stitch Techniques for Texture, Depth, and Color
Mastery in embroidery stitch techniques comes from blending multiple stitches to create texture and depth. Layer satin stitches with backstitch outlines, then add stem or chain stitches for shading and movement. Learning how to balance density, direction, and color transitions lets you craft motifs that feel dimensional rather than flat.
Projects benefit from a deliberate approach: map color study, plan stitch order to minimize thread breaks, and practice gradual increases in complexity. By combining technique with mindful fabric and thread selection, you’ll develop a flexible embroidery toolkit that translates ideas into expressive, durable fabric art.
Frequently Asked Questions
What are Embroidered design stitches and how is backstitch embroidery used for outlines in this technique?
Embroidered design stitches are the textures and lines used to outline shapes and add detail to fabric. Backstitch embroidery is ideal for clean, continuous outlines within Embroidered design stitches. To execute it, anchor the thread, bring the needle up at the start, take a small forward stitch, and return behind the previous end, keeping stitches about 2–3 mm and tension even.
How does satin stitch embroidery create smooth fills in Embroidered design stitches projects?
Satin stitch embroidery fills shapes with a dense, glossy surface by placing parallel stitches closely together. Start with light outlining if needed, then fill the area with long to short stitches arranged in neat rows. Use a suitable thread (like perle cotton) for a smooth sheen and minimal fraying, and ensure consistent density across the fill.
In a hand embroidery stitches guide, what are the key types of embroidery stitches used with Embroidered design stitches?
Common types include running stitch for light outlines, stem stitch for rope-like lines, chain stitch for borders, and decorative knots like French knots or Lazy Daisy for accents. These stitches complement Embroidered design stitches by adding texture, shading, and focal detail in a balanced hand embroidery stitches guide.
How do embroidery stitch techniques influence texture and depth in Embroidered design stitches?
Embroidery stitch techniques—such as stitch direction, density, and layering—create texture and depth. Satin stitch density affects fill smoothness, while backstitch provides crisp outlines. Plan color transitions and overlapping passes to suggest shading, movement, and dimensionality within Embroidered design stitches.
What fabrics and threads work best for Embroidered design stitches, and how do they affect stitch quality?
Even-weave fabrics like linen or cotton provide consistent gridlines for Embroidered design stitches. Threads such as cotton floss, perle cotton, or metallics suit different stitches and effects; floss is versatile for outlines, while perle cotton offers a smooth fill for satin stitch. Choose threads that glide smoothly through fabric to reduce fraying and maintain even tension.
What common mistakes should be avoided when learning backstitch embroidery and satin stitch embroidery in Embroidered design stitches?
Avoid uneven tension, inconsistent stitch length, and fabric movement in the hoop. Plan thread paths to minimize knots and trim ends neatly, and practice on swatches to build muscle memory. Paying attention to these embroidery stitch techniques helps you prevent puckering and achieve cleaner lines in Embroidered design stitches.
| Topic | Key Points |
|---|---|
| Backstitch | Reliable for outlines and sharp edges; technique: secure thread at the back, bring needle up at the start, take a small forward stitch, return behind the previous end; keep stitches short (2–3 mm); tips: maintain even tension, steady pace, and consistent length; longer stitches can mimic handwriting for a continuous line effect. |
| Satin Stitch | Creates smooth, glossy fills; outline lightly, then fill with parallel stitches from one side to the other; use short to long stitches, keep them dense and aligned; base layer of long stitches with shorter ones overlaid; plan color order to minimize thread breaks; preferred threads: perle cotton or smooth embroidery floss to reduce fraying. |
| Other popular stitches | Running Stitch; Stem Stitch; Chain Stitch; French Knot; Lazy Daisy and Fly Stitch; each adds texture and can be used for outlines, borders, centers, and natural motifs. |
| Fabrics and Threads | Fabrics: linen, even-weave cotton, or blends for consistent gridlines; Threads: cotton embroidery floss, perle cotton, metallic threads; choose based on weight, sheen, and project needs; blending and variegated threads can enhance effects. |
| Preparing and starting | Hoop fabric taut to reduce puckering; mark design with pencil or water-soluble pen; cut clean threads and avoid fraying; practice on swatches to learn tension, stitch length, and flow. |
| Applying stitches to projects | Mix stitches to achieve texture and depth: use backstitch for crisp outlines, satin stitch for bold fills, and stem or chain stitches for borders; French knots for centers or dotted textures; layer colors judiciously to minimize thread breaks and ensure clean transitions. |
| Common mistakes | Tension imbalance, inconsistent stitch length, thread breaks, and fabric movement in the hoop; mitigate with even tension, practiced technique, neat thread management, and keeping fabric flat and taut. |
| Practice and improvement | Structured routine: outline with backstitch; fill with satin stitch; try motifs combining multiple stitches; create color studies; build micro-projects to apply skills. |
| Projects and ideas | Floral corner designs with satin fills and backstitch outlines; monograms or name plates with bold outlines and selective fills; decorative borders using running, stem, and chain stitches; samplers showcasing all stitches. |
Summary
Embroidered design stitches shape fabric art by adding texture, depth, and personality to projects. This descriptive overview highlights how backstitch provides crisp outlines, how satin stitch yields lush fills, and how a range of stitches—from running to French knots—combine with fabric and thread choices, preparation, and practice to create expressive embroidery. By experimenting with stitches and practicing on swatches, you can build a versatile toolkit that makes every embroidery project feel engaging, cohesive, and uniquely yours.