The secret lies in embroidery stabilizers and hoops: keeping fabric flat, stitches clean, and designs centered. Understanding the right stabilizer type—from tear-away to water soluble stabilizer—helps you pick the best embroidery hoops and secure stability for a given project. Guides discussing embroidery stabilizers types help you compare options for different fabrics and designs. A hoop size guide for embroidery ensures design placement, while the essential embroidery tools complete the setup. With the right mix of stabilizer, hoop, and tools, you can achieve crisp lines and professional finishes.
From another angle, the idea of fabric stabilization is about backing materials and frame systems that hold the fabric steady during stitching. Instead of fixed terms, you’ll encounter references to backing, stabilizing layers, and embroidery frames that achieve the same goal of precise placement. Using related concepts such as stabilizing backing, frame tension, and removable supports helps readers connect to tools, techniques, and workflows across projects. Seen this way, the process remains about control, accuracy, and finish quality, regardless of the specific brand names.
Understanding Embroidery Stabilizers: Types, Weights, and How They Work
Embroidery stabilizers types cover a broad spectrum from tear-away and cut-away to wash-away and water soluble options. Each category offers a different balance of backing, removal difficulty, and fabric compatibility, influencing how stitches sit and how the design ends up looking on the final fabric. When you hear about stabilizers, think of them as the foundation that keeps fibers in place while threads pull from the needle, ensuring clean edges and balanced fills.
Weight and texture matter just as much as the type itself. Light stabilizers are gentle on delicate fabrics and fine lettering, while heavier options support dense fills and plush textures. A smart setup often combines stabilizers to manage stitch density without sacrificing drape or comfort, especially on knits, silks, or heavy garments.
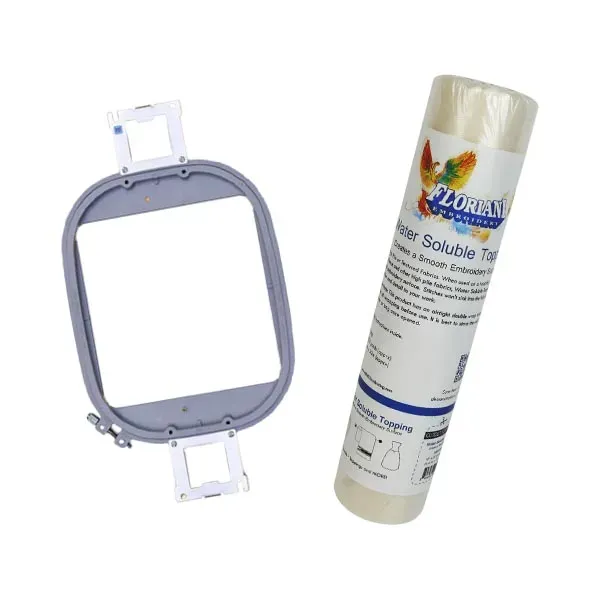
Choosing the Right Hoop: Best Embroidery Hoops and Hoop Size Guide for Embroidery
The hoop is the frame that keeps your fabric taut and your design positioned for accurate stitching. When selecting the best embroidery hoops, consider factors like frame stability, clamping pressure, and how smoothly the hoop handles fabric with different textures. A secure grip helps prevent puckering and drift, which is essential for professional results.
Hoop size matters, and a good rule of thumb is to choose a hoop at least 1-2 inches larger than the design’s width. This extra margin helps contain thread tails and stabilizer edges during stitching. A clear hoop size guide for embroidery can save time and reduce rework, especially when switching between large and small projects.
Maximizing Stitch Quality: How Stabilizers Influence Tension, Density, and Edge Cleanliness
Stabilizer weight and type directly influence tension and stitch density. Too little backing can cause fabric puckering, while too much can create a stiff feel and a heavy back. Proper stabilizer choice helps underlay stitches, satin lines, and dense fills stay crisp, producing cleaner edges on both woven and knit fabrics.
A well-planned setup often uses a layering approach—such as a base stabilizer with a lighter top layer—to balance surface appearance and back coverage. Dense fills or large areas may benefit from a thicker stabilizer or a two-layer arrangement that keeps the front smooth while maintaining support behind the design.
Water-Soluble Stabilizers and Washable Backing: When and How to Use
Water soluble stabilizers (WSS) and wash-away options are ideal when you don’t want any backing on the back of delicate fabrics or sheer garments. These stabilizers dissolve in water or leave no residue, making them perfect for projects where back coverage must be unobtrusive.
Removal is straightforward but depends on the product: wash-away dissolves with water, while some WSS options can be used as temporary toppings or combined with other stabilizers. For sheer fabrics or designs that should disappear after washing, this family of stabilizers often provides the cleanest finish.
Essential Embroidery Tools for a Crisp Stitch-Out
Beyond stabilizers and hoops, assembling essential embroidery tools sets the stage for consistent results. Sharp embroidery needles, the right needle size for the fabric, and a selection of scissors and snips help you trim stabilizer and fabric without fraying or snagging.
Temporary adhesives, stabilizer underlays, marking tools, and finishing supplies round out the toolkit. A small stash of clean-up brushes, lint-free cloths, and seam sealers keeps backings tidy after the stitch-out and minimizes post-work cleanup.
Putting It All Together: embroidery stabilizers and hoops for Consistent Stitch-Outs
A practical setup starts with planning the design and fabric, then selecting stabilizers and a hoop that provide stable support. If you’re unsure, begin with a lighter stabilizer and test on scrap fabric to verify tension, density, and alignment before committing to the final piece.
Step-by-step, plan the design, prepare the stabilizer, mount the fabric in the hoop, and run a test stitch. As you stitch, monitor movement, re-hoop if necessary, and finish by removing or trimming stabilizers according to their type. This disciplined approach helps you achieve reliable, professional results across garments, accessories, and decorative items.
Frequently Asked Questions
What are the main types of embroidery stabilizers (embroidery stabilizers types) and how do you choose the best embroidery hoops for your project?
Embroidery stabilizers types include tear-away, cut-away, wash-away, and water soluble stabilizers, each suited to different fabrics and designs. For the best embroidery hoops, pick a hoop size 1–2 inches larger than your design and ensure a secure, even grip to prevent fabric distortion. Matching the stabilizer weight to the fabric and using a proper hoop helps keep stitches flat and centered.
How does water soluble stabilizer work and how can the hoop size guide for embroidery help you position designs on delicate fabrics?
Water soluble stabilizer dissolves in water, leaving no residue, making it ideal as a temporary topping or in combination with other stabilizers for sheer or delicate fabrics. The hoop size guide for embroidery helps you select a hoop large enough to frame the design with extra stabilization margin, preventing edge drift and minimizing show-through.
Which stabilizers should you use for light fabrics, knits, or dense fills, and what role do essential embroidery tools play when hooping?
For light fabrics, use a light tear-away or wash-away stabilizer; for knits, a cut-away or a layered setup to control stretch; for dense fills, opt for heavier stabilizers or two-layer configurations. Essential embroidery tools—sharp needles suited to the fabric, precise scissors, temporary adhesives, stabilizer underlays, and water-soluble markers—support secure hooping and clean stitch finishes.
What is the difference between tear-away and cut-away stabilizers and in which scenarios should you use the best embroidery hoops to keep designs centered?
Tear-away stabilizers are easier to remove and work well on stable woven fabrics, while cut-away stabilizers provide permanent backing ideal for knits or high-durability needs. In both cases, using the best embroidery hoops helps maintain even tension and precise placement, especially for dense designs where movement must be minimized.
How do you apply a hoop size guide for embroidery to ensure your design stays centered and minimize stabilizer show-through?
Start with a hoop that is 1–2 inches larger than the design, center the design in the hoop, and secure the stabilizer beneath the fabric. This setup, guided by the hoop size guide for embroidery, helps keep stitches aligned and reduces visible stabilizer on the back.
What are essential embroidery tools and stabilizers that work well together to create professional results with sturdy hoops?
Essential embroidery tools include sharp needles, precise scissors, temporary adhesives, stabilizer underlays, and water-soluble markers. Pair these with stable stabilizers (appropriate weight and type for the fabric) and a sturdy hoop to achieve clean edges, balanced tension, and professional-looking stitch-outs.
| Aspect | Key Points |
|---|---|
| Stabilizers: Purpose | Foundation for embroidery; prevent warping; control stitch density; influence underlay, satin stitches, and edge quality on woven and knits; choose stabilizer so it disappears or remains only where needed. |
| Types of stabilizers | Tear-away (woven fabrics, tear away after stitching); Cut-away (permanent backing, good for knits and durable designs); Wash-away (no show on back); Water soluble stabilizers (temporary toppings or combos); Stabilizer weights (light/medium/heavy) to balance fabric and stitch coverage. |
| Choosing stabilizers by fabric | Light fabrics: light tear-away or light wash-away; Knits/stretch: cut-away or multi-layer; Dense fills/large areas: heavier stabilizer or two-layer setup; For garments that will be worn and washed: balance stabilizer weight and setup. |
| Hoops: selection & use | Hoop keeps fabric taut for consistent stitches; Traditional hoops (various sizes); Adjustable/snap-on hoops; Q-Snap/external frames for large/bulky fabrics; Hoop size should be 1–2 inches larger than design; Center design, align with grain, secure stabilizer, mark position. |
| Tools for embroidery | Sharp needles; Scissors and snips; Tear-away/cut-away guides; Temporary adhesives; Stabilizer underlays; Water-soluble marking tools; Cleaning/finishing supplies. |
| Step-by-step setup | Plan design and fabric; Prepare stabilizer; Layer and mount stabilizer under fabric in hoop; Test run on scrap; Stitch with care; Post-stitch finishing to remove stabilizer. |
| Common mistakes | Fabric puckering, design shifting, visible stabilizer on back, stitch density issues; Fixes: adjust stabilizer weight, re-hoop, use lighter stabilizer or wash-away, adjust machine density. |
| Real-world outcomes | A structured approach with the right stabilizers, hoop, and tools yields crisp lines, balanced tension, and professional finishes across garments and decorative pieces. |