Design Your Own Embroidered Patches is more than a craft project; it’s a powerful way to tell a story, showcase a brand, or celebrate a group. Whether you’re outfitting a sports team, launching a small fashion line, or giving friends a personalized accessory, patches offer a compact canvas for creativity. The best patches look sharp, stay durable, and convey the right message at a glance. This guide walks you through practical steps, design ideas, and expert tips that help you produce patches that stand out on fabric. From concept to production, you’ll learn what makes patches feel unique, professional, and ready to wear.
Thinking about badge creation or fabric emblems, the core goal remains the same: clear messaging, legible typography, and durable stitchwork. In other words, the process is about crafting personalized patches that align with a brand or group while balancing shape, size, and texture. For designers exploring this craft, consider starting with templates, then refining with embroidery techniques for patches to achieve depth without sacrificing readability. If you’re wondering how to begin, the key is to map your idea to simple shapes, test contrast on light and dark fabrics, and choose backing options that suit your distribution plan. For crafters and small businesses seeking inspiration, creating a product line around custom embroidered patches can be a smart, scalable path.
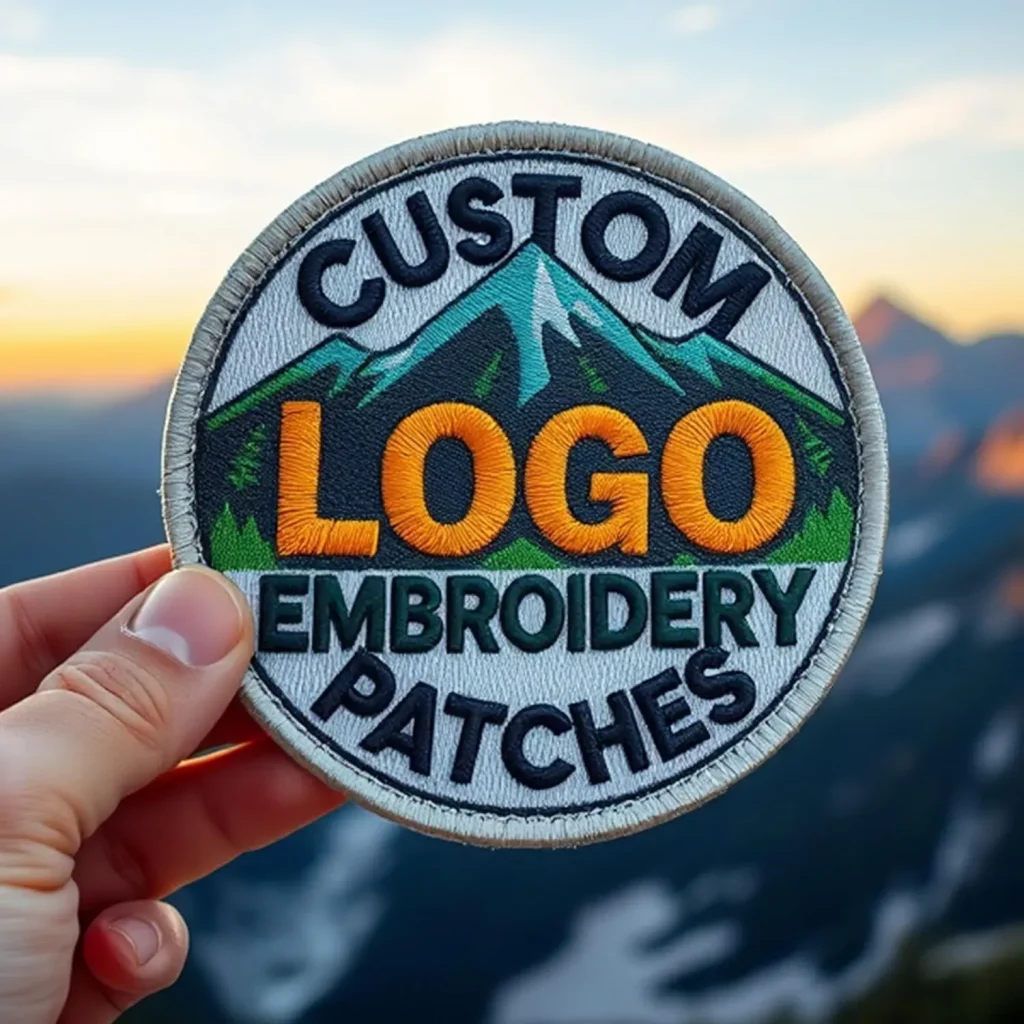
Design Your Own Embroidered Patches: From Concept to Production
Design Your Own Embroidered Patches is more than a craft project; it’s a narrative you wear on fabric. When you start with a clear concept and a target audience in mind, you align your design with the goals of custom embroidered patches, ensuring the message remains legible from a distance while withstanding daily wear.
From concept to production, decisions about size, shape, and border influence both aesthetics and durability. By pairing strong patch design ideas with proven embroidery techniques for patches, you create a compact canvas that communicates your story at a glance and remains practical for manufacturing.
Mastering Patch Design Ideas for Standout Garments
For patch design ideas, start with a bold central motif and a restrained color palette. A well-chosen silhouette reads quickly on fabric and scales gracefully across items like jackets, bags, and caps, making it ideal for badges and club emblems. This approach supports consistent branding in a world of custom embroidered patches.
Test variations on multiple fabrics to confirm legibility and balance. Evaluate how text size, line thickness, and imagery read from a distance, applying feedback to refine your concept into a ready-to-produce set of patch designs built around clear patch design ideas and practical production considerations.
How to Design Patches: From Concept to Digitizing
Understanding how to design patches begins with clean vector art and clear outlines. The digitizing phase turns your sketch into stitch instructions that embroidery machines can follow, critical for producing consistent results for custom embroidered patches.
Create test stitch-outs to verify stitch density, underlay, and edge finishing before any production run. Decide whether to outsource digitizing or handle it in-house, and keep a detailed spec sheet with color references and stitch counts to guide the process, ensuring your method for how to design patches remains efficient and repeatable.
Embroidery Techniques for Patches: Stitch Choices, Texture, and Longevity
Choose embroidery techniques for patches that balance coverage and durability. Satin stitches work well for bold outlines and solid graphics, while fill stitches handle larger color blocks; this combination yields clean edges and lasting color across custom embroidered patches.
Experiment with stitch density and layering to add texture without sacrificing wearability. Finishing touches like merrow borders or a clear edge improve resilience against fraying and enhance the patch’s presence on varied fabrics, reflecting a thoughtful application of embroidery techniques for patches.
Choosing Colors and Backings: Durable Finishes and Badge Embroidery Tips
Color choices influence readability and brand recognition; limit palette to a few core hues that contrast strongly against target fabrics. Test colors on light and dark backgrounds to ensure legibility, and plan color references early to keep production efficient for your custom embroidered patches.
Backings influence application and durability; iron-on, sew-on, and hook-and-loop options each suit different use cases. For a cohesive line of patches, standardize the backing and add finishing touches like a merrow edge to align with badge embroidery tips and ensure reliable wear.
Production Planning and Quality Control for Custom Patches
Production planning for custom embroidered patches means clarifying minimum order quantities, pricing, and lead times before committing to a run. A well-documented spec helps vendors quote accurately and avoids costly revisions, a practical step in steering your project toward consistent quality.
Request stitch-outs or digital proofs, assemble a color-ready artwork package, and write care instructions to accompany each patch. This proactive approach supports durable finishes and makes your patches more market-ready, reinforcing the value of badge embroidery tips when coordinating large or ongoing runs.
Frequently Asked Questions
Design Your Own Embroidered Patches: How do I begin with patch design ideas and planning?
Start with a clear purpose and audience, then decide patch size and shape, choose imagery and typography, and pick a small color palette. Plan whether you’ll digitize in-house or hire a digitizer, and create test proofs to ensure the concept reads well on fabric.
What embroidery techniques for patches should I know when designing Design Your Own Embroidered Patches?
Use satin stitch for solid areas, fill stitch for larger blocks, running stitch for outlines, and split stitch for fine lines; combine stitches to add depth, and finish with a merrow or satin edge for durability.
Design Your Own Embroidered Patches for a sports team: what badge embroidery tips apply to patch design ideas?
Aim for bold shapes and high-contrast colors to stay legible from a distance; keep text minimal, test on the team jersey fabric, and choose a durable backing and appropriate size to fit on uniforms.
How can I apply patch design ideas when creating custom embroidered patches for fashion or streetwear?
Experiment with abstract shapes, geometric lines, and bold color blocks; test multiple colorways on light and dark fabrics, and create variations (with and without text) to see what reads best on different garments.
What are key embroidery techniques for patches to ensure durability when working on Design Your Own Embroidered Patches?
Prioritize appropriate stitch density, choose sturdy backing, and select a merrow or satin edge; avoid overcrowding elements, and validate with a stitched sample on the final fabric.
Design Your Own Embroidered Patches: what should I consider for production planning, pricing, and vendor selection for custom embroidered patches?
Prepare vector artwork with color references, estimate stitch counts, obtain multiple quotes, request stitch-outs or proofs, and agree on minimums, setup fees, and backings to control cost and ensure quality.
| Key Topic | Summary |
|---|---|
| Why patches matter | Patches are a storytelling canvas for brands, teams, or personal style; focus on durability, sharp appearance, and clear messaging. |
| Main success ideas | Clarity, legibility, durable stitching, and a cohesive color palette make patches effective. |
| Process approach | Start with a solid concept and end with a finished product, using a structured workflow to avoid common pitfalls. |
| Planning & concept development | Clarify purpose (club badge, brand emblem, event souvenir, or streetwear); the intended use shapes size, detail, and durability; set goals for audience resonance. |
| Size & shape | Sizes commonly range from 1.5–3 inches for casual wear to 4 inches+ for statement pieces; shape reinforces message and aligns with seams or backpacks. |
| Design elements | Central imagery with minimal, legible text; bold fonts; add an outer edge or merrow border; test variations for readability. |
| Color & thread | Limit palette to a few contrasting colors; consider light/dark fabrics; establish core colors for brand consistency. |
| Threads & techniques | Use satin for solids, fill for large areas, outlines with running or split stitches; combine for depth; use texture for contrast and a vintage vibe. |
| Digitizing vs hand-drawn | Digitizing turns art into stitch instructions; aim for clean outlines, balanced stitch directions, and appropriate stitch counts; options: self-digitize or hire a digitizer; provide vector art and stitch tests. |
| Backing & finishing | Backings (iron-on, sew-on, Velcro) affect practicality; include durable edges (merrow/satin); consider uniform backing for a line. |
| Production planning & pricing | Plan for MOQs, setup fees, unit costs; obtain quotes and stitch-outs; share color references and stitch counts; explore upgrades like heat-seal or magnetic backs. |
| Design ideas & examples | Use templates to spark ideas; badges for groups with emblems and mottos; fashion/streetwear with abstract shapes and bold color blocks; ensure simple shapes read at small sizes. |
| Common mistakes | Avoid overcrowding, tiny text, and overly intricate details; test on light and dark fabrics; verify color choices with thread samples; plan for oversizing on small items. |
| Care & durability | Provide care guidance; durable stitches and materials enhance longevity and perceived value. |
Summary
HTML table illustrating the key points of the base content about designing your own embroidered patches. After the table, the conclusion summarizes the topic with a descriptive, SEO-friendly focus on ‘Design Your Own Embroidered Patches’.